Tuesday, February 7, 2012

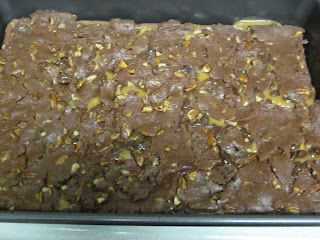
Knock You Naked Brownies


You may or may not know about my dessert obsession. Much like the Lindt chocolatiers, I dream in chocolate. I literally woke up one morning and decided I needed to make brownies with caramel in the middle. This was shortly after a disappointing experience with stuffed french toast that wasn't actually stuffed - I wanted something to be stuffed properly. So I stuffed some brownies. With caramel. Totally normal.

Side note: Do you say car-mel or care-a-mel? I am a car-mel person, but I am secretly envious of those who say care-a-mel. I feel like the care-a-mels are SO fancy and elegant. I'm not that fancy. I'm just a regular girl who made gobs of brownies for a Super Bowl party.

I saved some of the brownies before taking them to the party. I'm currently staring at the last one. I want to eat it but I don't want them all to be gone. Such are the problems of fat-minded people. 

I found this recipe from the Pioneer Woman. I love her. I don't think she's made a single thing that doesn't look good to me. She made these brownies. I made these brownies. I would marry anyone who made me these brownies.


Don't judge me, but the ingredients are a little strange. You'll need a german chocolate cake mix, evaporated milk, chocolate chips, melted butter, chopped pecans, and caramels.


Start with the cake mix. If you're not a cake mix person, do not jump to decisions too soon. I promise it tastes nothing like a boxed cake.


Mix 1 cup chopped pecans, 1/3 c. evaporated milk, and 1/2 c. melted butter with the cake mix. Use a spoon and your hulk muscles, because this batter is about to get THICK.


Stir. Stir. Stir. It's a lot more difficult than it looks.


Smush it all down. You'll need to create two pieces - one for the top, one for the bottom of the brownies.


Just cut the batter in half and take out one piece. This is half the batter. I know, it's a revelation. I teach fractions to 4th graders.

However, this picture may look confusing. I made a double recipe. Hence, I needed 4 pieces. Don't think about them.


Smush one piece on the bottom of a greased 9x13 pan. Use your hands and press until it covers the entire pan.


Bake for about 8 minutes to set a solid foundation for the caramel.


While you're mixing the batter, have a double boiler going to melt the caramels. You'll need about 60 caramels and 1/2 c. of the evaporated milk.


This took me a while to do. This is about half-way there. Don't give up. Keep stirring. Keep melting. Keep eating the spare caramels.


Admire the smooth, creamy caramel sauce. Enjoy the satisfaction that you were able to finally melt those suckers down.


While the caramels are melting, press the remaining portion of the dough into a piece the size of your pan. Let this sit for just a minute or two.


Pour the caramel sauce over the baked brownie layer. Spread it out so that every portion is covered.


Sprinkle with 1 c. chocolate chips.


Here's what proved to be the most difficult part of baking these - transferring that top layer of brownies on top of the caramel sauce. Mine kept falling apart. I tried to piece it together on top of the caramel, but it didn't work so well. I just rested on the fact that no one will complain that they don't look perfect. Plus, I covered them with powdered sugar so perfection wasn't necessary.


This batch worked a bit better, but still not perfect.


Now, here's the worst part. Bake them for 20-25 min more. But, when they're done, you may not eat them right away. You have to let them cool in order for the caramel to set. I had mine rest on the counter for 20 minutes, then placed them in the freezer for an hour and it worked perfectly.


Dust with powdered sugar. I like to think of it as crack powder. Anything with powdered sugar is highly addictive. People will sell organs for it. Add powdered sugar.

Then use your hulk muscles and cut the brownies.


Perfection. Chocolatey, caramely, nutty, chewy, perfection.

Monday, February 6, 2012

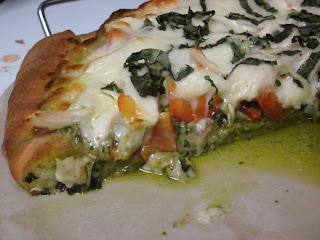
Chicken Pesto Pizza

This recipe came from my dear friend Kim. She's funny. She's kind. She's beautiful. She's in killer shape. She's obsessed with food almost as much as I am. She makes the BEST desserts and obviously has good taste in dinner food as well. I have great friends. 

Pizza is always good. However, this one isn't awful for you, but is jam packed with FLAVOR. Oh, I'll just tell you it's beautiful and colorful and smells like an italian heaven. 


You'll need a canned pizza crust, jarred pesto, 1/2 red onion, 1/2 red bell pepper, 2-3 roma tomatoes, grilled chicken breast, 2 cups mozzarella, and basil to top the pizza


Preheat your oven to 425F or whatever the package says. Spread the crust on your pizza stone and bake for 8 minutes to set the base.


While the crust is cooking, start chopping and sautéing your veggies. Kim grills them because she's a boss. I'm not as cool as she is, so I just used a regular pan.


Here's the red onion, red pepper, and red tomatoes. Wowza, I like red. It looks really pretty.


Veggies. They look good. They taste good. They are good for you.


Take the crust out of the oven.


Spread pesto on the top of the crust. We used about 1/2 cup. Kim uses lots more. It's fine! Use what you think is best.


Add your veggies and shredded chicken. Spread it evenly.


Top with all the cheese. Oh yeah. I've said it before and I'll say it again. I. Love. Cheese.

The cheese bakes down and doesn't look quite as ridiculous once it's cooked. Promise.


Add some sliced basil. It tastes good, but mostly it makes it look pretty. There's plenty of basil flavor in the pesto if you don't have any.


Bake for another 10 minutes or so until the crust is golden. (A little lighter than this will be good too. I was in a crunchy-pizza mood. Lies. I left the room and didn't hear the timer right away. Promise it was still delish!)


Stare at it from every angle because you're amazed at your creation.


Cut your pizza. Eat your pizza. Love your pizza. Accept that some of the pesto will leak out. That's the price we pay for love.


Pizza. It's what's for dinner.

Ranch Crock Pot Pork Chops


There's nothing better than an easy dinner that I feel like I don't even have to make. I've been really into using the Crock Pot lately - for some reason it's always Wednesday. Maybe because it is the middle of the week, maybe its that I'm lazy. Whatever it is, it has been a blessing. I feel like God makes me dinner every time I walk in the door, because it's already ready!


All you need for this recipe is 4-6 pork chops, a can of cream of chicken soup, and a ranch packet. That's it! I love this recipe. Its pork, its ranch, its gravy, its perfect.


Here's the hard part. Put the chops in the crock pot, followed by the soup. Last, add your ranch packet. Cover and let it cook on low for 6-8 hours.


Leave for work. Forget about your dinner - or think about it all day like I do. Come home and smell the greatness. It's ready to go.

Put it on mashed potatoes. You could do rice, but buttery mashed potatoes are SO good and comforting.


GAH. So easy. So delicious.

Thursday, February 2, 2012

Lemon Garlic Roasted Broccoli


This has become one of my all-time favorite side dishes. Since discovering it in October via the Barefoot Contessa, we have easily made it 10 times. We even had it on Thanksgiving. If everyone cooked broccoli this way, I am convinced there would be so many less children complaining about eating their vegetables. And it is so stinking easy!


All you need is a bunch or two of broccoli cut into florets, 3-6 cloves of garlic (based on your comfort level), 1-2 lemons (based on how much lemon you like - I like lots of lemon), salt, pepper, olive oil, and 1/4 c. parmesan cheese. Fresh is always best, but it works with store bought ingredients too!


Preheat your oven to 425F. It has got to be hot!

 Chop up your garlic until it's really nice and small.


Toss your broccoli with the garlic. Spread out on a foiled cookie sheet. Drizzle with olive oil. Put it in the oven for 20 minutes, mixing all of the ingredients half way through.


Meanwhile, zest and seed your lemons.


When the broccoli comes out of the oven, drizzle with the juice of your lemons. Add the zest and parm. Mix it up and serve. :)


I can't tell you how this is left over, because no matter how much we make, there is NEVER any left over. It is that good. It's lemony, a little garlicy, crispy, cheesy, and perfect.

Try it. You'll like it! If you don't, call me. I'll eat your leftovers. 

Wednesday, February 1, 2012

Iced Coffee Bliss

Let me just start by explaining my love for iced coffee. It is a love that runs deep inside me. It runs through my veins and wakes me up in the morning. It is a relationship that caused me to dish out the big bucks to purchase it often.

That love has changed recently, and I very much like it. I have brought the love home, to my very own kitchen, and I will just say that it is one of the best relationship choices I have ever made.

All you need to start this love at home is 1/2 a 1 lb. bag of your favorite coffee and water! Cheap and easy, just how we like it... Okay, too much.

You'll also need two very large bowls (one with a lid), a strainer, paper towels, and a pitcher or two (enough to hold a gallon of coffee).


Here is my coffee. It is my all time fave for iced coffee. It's strong. It's glorious. It tastes wonderful even when watered down. However, I accidentally bought the whole bean, so I had to grind it up. This was a first for me!

Note: If you buy Starbucks coffee, save the bag! You can take the bag in to a Starbucks and get a free tall coffee. Always a plus. :)


Here I go, grinding my coffee into oblivion. Let me tell you, I no longer thought of this as a mistake. Grinding the whole beans up gave my kitchen SUCH a strong coffee scent that it was completely worth it!


Take the coffee grounds and mix them with 1 gallon of water until all of the grounds are wet.


Yum. Coffee mud. Love it.


Cover that up and let it sit for at least 8 hours. The longer, the stronger, the better. I usually leave it overnight.


Here is the weird, messy, fun part. Line a strainer with paper towels. Put the strainer over your other bowl. Pour your coffee through the strainer so the grounds stay in the paper towels but the coffee goes into the bowl.

Pour this in your pitchers, refrigerate, and love.


Fill a cup halfway with ice. (See all of the oranges in the background? Hubster's parents brought them on my birthday. They are such good oranges!)


Add the iced coffee.


Fill until close to the top.


Add some of your favorite cream and sugar. Flavored syrups work great here.


Stir and enjoy. You need a straw to drink this. Just because it's more fun to drink from a straw.